
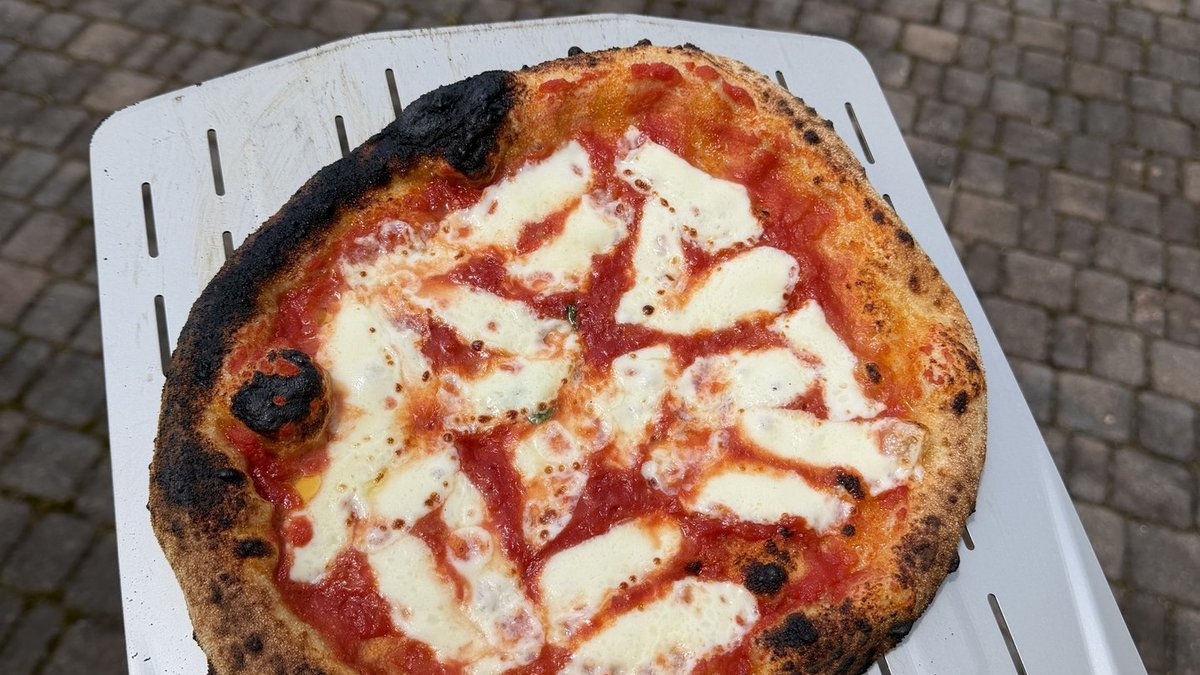
Neapolitan Style
Tipo '00' and Spelt flour mix, overnight, designed for outdoor pizza oven
My earliest memories of making pizza are not until being an adult. Someone I worked with had a pizza party. They had an indoor pizza oven built into their kitchen. They had several people over, and had dough ready to stretch, sauces, toppings, and their oven hot from the wood burning in it. I don't remember what pizza I made, or how it got made, did I launch it? I know I ate it for sure and remember it changing me. I really enjoyed this pizza I made, and there was something about making it that had me feeling good.
Soon after, I remember buying some dough, sauce, and cheese from trader joes and making a pizza. I don't remember where I learned to buy a pizza stone, possibly on some bbq source forums because that's what I used to bake them. After baking pizza for myself the first time I realized I could make pizza better than I could buy.
This had a lazy effect on me where rather than make more pizza, I started searching out better pizza places. I started developing an opinion for what I liked in a pizza, on a pizza, the sauce - what made a good pizza. Taking mental notes of where I had good pizza became a thing. I've had a lot of opportunity to enjoy pizza in California, Nevada, New York, New Jersey, Pennsylvania, DC, Toronto, England, Norway, and Sweden. I have to stop keeping track because whereever I go anymore it seems people are making better and better pizzas.
I live in Eastern Pennsylvania. An area near New York and Philadelphia cities with amazing pizza cultures that certainly emanate a radius. An area with many good pizzerias on its own. It's funny sometimes to talk about how good a pizza in the next town might be, but then I rarely go there because I have to drive past three other great pizza places on my way.
A few years ago I bought a breadmaker, for basic breadmaking purposes. Breadmakers often have recipes for things other than bread, like pizza dough. It's not a stretch (dough pun) to connect these dots. After some unsuccessful stubborn "direct on the bbq" attempts, I did a proper pizza on a pizza stone on the bbq and I felt that good feeling again.
With so many good pizzas to compare against, was my home pizza as good as I could buy? Not quite.
I approached this as a challenge. I needed to identify what series of successful steps result in a good pizza. How can I refine those steps to result in a great pizza. Ultimately this led me to where we are now. I break down pizza making into four discrete pillars; making dough, making sauce, shaping/topping, and baking the pizza. The pizza you want to make is a result of your combined effort in those four areas.
This is an end-to-end master guide built from four processes, a basic pizza dough, a basic pizza sauce, stretching for a Neapolitan style pizza, and baking a Neapolitan style pizza. If you've got your first pizza oven - this will definitely take advantage of it. From here you can hone your craft, maybe focus more on one style or another, pan curious, different oven, different flour or hydration, preferments ...?
Dough
Sample Pizza Doughoptimized for stand mixer62% Hydration, with two hour bulk ferment, and 24 hour cold ferment. Four ingredients, maintained in bakers percentages, calculated for your batch size.
| Ingredient | % | ~g |
|---|---|---|
| Caputo Blue Pizzeria Tipo 00 Flour | 100% | ~600g |
| Cold WaterWater | 62% | ~372g |
| Sea Salt | 2.2% | ~13.2g |
| Active Dry YeastLeaven | 0.3% | ~1.8g |
- Get ingredients, mixing bowls, tools, and utencils ready
- Add water to the mixer's bowl
- Add flour(s) to the mixer's bowl
- Mix slowest speed with dough hook just until it sticks together with no dry flour left on bottom
- Autolyze for 30 minutes
- Mix slowest speed with dough hook and add yeast
- Continue mixing on slowest speed and add salt
- Continue mixing on slowest speed for total 4 - 5 minutes
- Turn dough out onto dry surface (no flour, no oil)
- Hand knead dough until dough reaches 74F
- Ball up on one bulk dough and room temp ferment for 90-120 minutes
- Divide into equal parts, and ball up individual dough balls
- Store dough balls in pizza dough trays or lightly oiled plastic container with lid in refrigerator for 24 - 72 hours before use
Sauce
Basic Pizza Sauceoptimized for blenderBasic tomato sauce - use good canned tomatos; open can add salt. Ingredients maintained in bakers percentages based on main ingredient, calculated for your batch size. Blender not necessary, you can crush these in your hands, it's just easier. Only use blender on lowest speed setting, and blending takes no time at all 5-10 seconds.
| Ingredient | % | ~g |
|---|---|---|
| Canned Whole-Peeled San Marzano TomatoBase | 100% | ~800g |
| Sea Salt | 0.5% | ~4g |
- Remove carafe from blender
- Empty can content into carafe
- Add salt to carafe
- Cover carafe, return to blender
- Blend on lowest setting for ~10 seconds
- Remove carafe from blender
- Check tomato consistency and stir to ensure salt is incorporated
- Use, or portion and use right away and freeze the rest
Shaping
Neapolitan Style PizzaHandHow to get a beautiful round pizza with just the right thickness on crust and edges. Learn this stretching technique as a series of repeatable steps. Prepare, extract, shape, stretch, develop a crust, and apply your toppings as you prepare your pizza for baking.
- Ensure pizza oven is at target temperature. Start stretching out dough after oven is ready to go
- Place peel next to your work area and dust with semolina
- Place a mound of semolina on your work surface, large enough to drop your dough onto and deep enough that it will stay above the work surface
- Using a scraper to remove dough from storage, preserve the bottom as the bottom and top as top, and place onto semolina mound upside-down. If the dough is mishapen, gently help it be round again now.
- Use fingers with light pressure, starting at the center and working towards the top, leaving the crust. Flip dough and repeat, pressing dough out of other half/from the other side. Turn dough 90 degrees and repeat, then flip dough and repeat.
- For final stretch, pick up dough and rest the crust on your knuckles. Rotate the dough over your knuckles. Depending how strong your dough is, raise or lower dough off the work surface to adjust the effect of gravity stretching your dough
- Drop dough down onto launching peel, minimally adjusting back into shape
- Add sauce, take care not to press dough down into peel while spreading sauce
- Add cheese and toppings, take care not to stack more than one layer. Cheese can overlap or leave sauce exposed +/- 20%, toppings should be spread out - try it, adjust to taste
- This pizza must be baked now, continue to your baking steps
Baking
Low Neapolitan StyleDeck700°F · 3.5 minThe pressure is on, but it doesn't need to be. Slow down time and let yourself focus on exactly how to launch, turn, and bake your pie without any flops, tears, or burns. Maximise every opportunity to learn the muscle memory, effort, and feedback of baking your pizza.
- Preheat oven to target temp (700F) If your oven has digital controls, set heat to 700 and 5:2 top:bottom heat ratio
- For analog controls, check oven air temperature and raise or lower heat setting towards target temperature
- Once air temperature is settled, check oven stone temperature and raise or lower heat setting towards target temperature
- Your pizza should be on a peel waiting to be launched at this time
- Look in the oven, find a spot in the center/back part of the oven to target
- Enter the oven with peel, parallel to the stone deck and place the front edge of the peel on your target
- With a controlled, deliberate motion, drop the front of the pizza on to the stone
- Continuing the controlled, deliberate motion, keep momementum of pizza sliding off peel and laying on stone deck
- Turn pizza as needed. Ensure pizza is loose on stone, then using a turning peel lift one side of the pizza - pull it towards you while rotating pizza peel back under pizza continue rotating pizza, then lift and return pizza to original target spot
- Check pizza bottom. If pizza bottom bakes faster than top, lift pizza with turning peel and raise to sear the top in the hottest air in the highest part of the oven
- Use peel to remove pizza and place on wire cooling rack for 2 - 3 minutes
- Slice pizza through center every 60 degrees
- Enjoy a job well done
Want to use this guide?
Create a free account or sign in to copy this guide to your account.